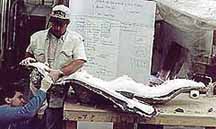
A foam body being removed from its mold
We want a thick, wet-looking skin, lots of blood and body fluids, and a set of internal organs. And this isn't a still-photo shoot, it's a movie - so we'd like our alien to move in a realistic manner as well. (Yes, it's dead, but it would be nice if our "examiners" could move it around.)
It's not difficult to build a creature that moves well. It's not difficult to build a creature that can be autopsied. It IS difficult to build a single creature that can do both. If we design our creature with movement as our main goal, the required mechanical understructure won't leave much room for the internal organs. If we design it with the autopsy in mind, its thick skin and lack of skeletal structure will prevent it from moving very well. Huge, obvious wrinkles will appear at the joints if our actors try to move the limbs on camera.
Well, it's an autopsy movie, which effectively makes our choice for us. But it's also part of our job to work with directors and actors to help show off our effects to their best advantage. Later, on the set, we'll do our best to obscure the fact our alien doesn't move.
(If we really wanted to do a classy job, we might use our mold to build two identical bodies - one to move and one to autopsy. We'd use the first in the preliminary scenes and let the "doctors" handle it all they liked, then swap in the autopsy version for the later scenes. Maybe next time.)
We need space inside our alien for the abdominal organs and brain. To do this, we suspend a "core" inside our mold - a plaster blob shaped to fit neatly inside the torso and head. We place our core to allow the proper amount of airspace between it and the interior surface of the mold. When we fill the mold, this airspace will become the skin we cut through to get to the organs. (We don't need a core for the arms and legs - we'll just let them fill up with our skin material since we've already decided not to bother making them posable.)
And what skin material should we use? We have several options, actually...
Just before we close the mold and inject our chosen filling, we may want to add a bit of structure to certain areas. For example, we could embed some wires into the fingers so we can pose the hands. This will mean we can't move the fingers on-camera... so we won't!
We inject our mold with our chosen filling and wait for it to set up.
A foam body being removed from its mold
We open the mold - voila! An alien. We cut into the corpse's back and remove the core, leaving a hollow space for our alien guts.
The head requires a little extra attention because we want to peel back the skin and reveal a skull. We're not really going to see very much of this in our final film so all we need to do is put a solid shape - most likely made of plaster or fiberglass - into the hollow left behind by the core. In fact we'd probably use a duplicate of our core to ensure an exact fit.
If we had a bigger budget we might go as far as an articulated underskull with a hinged jaw and eyelids and so on - so our "examiner" could fiddle with the eyes and mouth during the examination. Maybe next time.
We trim and patch the body's seam lines where needed. We give our little friend a quick paint job - it doesn't have to be very detailed because we already know this dummy will only be seen in grainy black-and-white.
We stick oversized eyes in our head and put some sort of film over them. We'll be removing this covering as part of our "autopsy". (It won't make a lot of sense, but it'll be icky!)
And we're done.
Oh, almost done. Let's tear out some of the material on the right thigh, paint a bit of blood on it, and create a big, ugly "wound". Should take an extra half hour or so.
The Truly Dangerous Company
 Return To UFO Information Menu.